Configuring the Application with the Setup Tool

After you've installed the application, finish setting it up using the setup tool. From the tool, you'll enter information about your license, database connection, user identity system, email system, and system admin credentials.

After you've successfully finished with the setup tool, the application is set up to run. For a brand new community, when you next log in to the end user interface, you'll have a chance to create a profile, an interface theme, and simple space hierarchy. You can also send invitations to people to join the community.

Starting the Setup Tool

If you've just installed, the setup tool will run the first time you access the application. If you've already completed the setup process and need to use the tool again to configure LDAP, do the following:

  1. Stop the web application and httpd services by running jive stop webapp followed by jive stop httpd.
  2. Edit /usr/local/jive/applications/sbs/home/jive_startup.xml so that the <setup> element has the value "false" (meaning "setup has not been run").
  3. Start the web application and httpd services by running jive start webapp followed by jive start httpd.
  4. Point your browser to the Jive community Admin Console URL. By default, using the built-in application server, this URL is: http://<webapp_hostname>:8080/admin.
  5. Rerun the setup tool.

License Settings

Enter the license key you purchased (you can retrieve your purchased keys by logging into www.jivesoftware.com) or click Continue to accept the local system license.

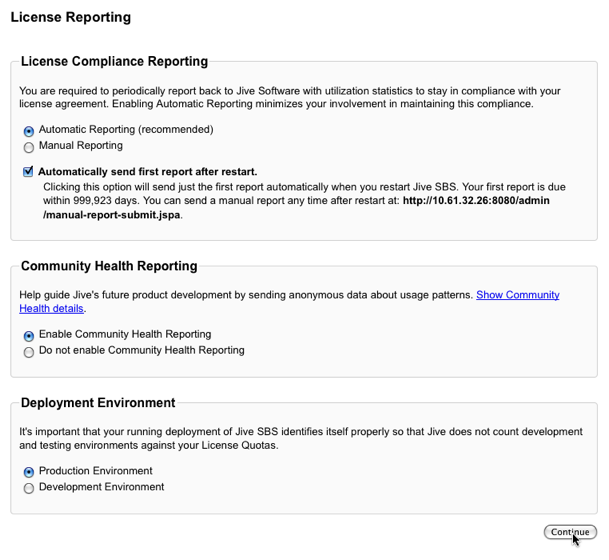
On the License Reporting page, choose whether to have your report sent automatically or to send it manually. Given that periodically sending a license report is required, having it sent automatically might save you the trouble of having to remember to send it. On this page, you also opt in or out of community health reporting, which provides feedback to the development team. Finally, specify whether this will be a production or development instance.

For more about license reporting, including what the reports include, be sure to see Managing the Deployment License.

License reporting

Database Settings

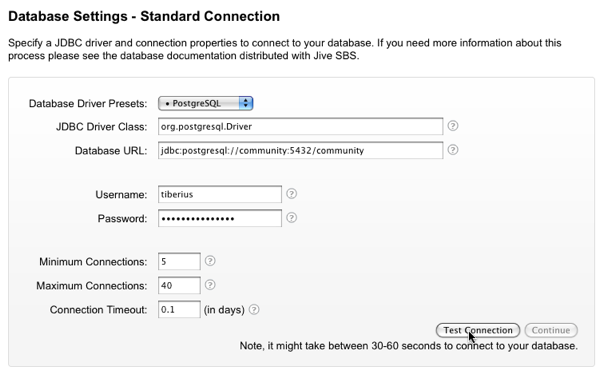
Specify how to connect to the application database. You can use the included local system database or you can choose an external database. If you choose the standard database connection or JNDI datasource, you'll be prompted for required settings after you click Continue. Here's an example of a standard connection configuration:

DB setup

User Settings

Specify the system that the application should use for user and group data.

For the Default option, the setup tool will use the user and group database tables from the application database.
  • If you choose Default and then click Continue, you'll reach the User Profile Name Configuration page. There, you'll be prompted to specify whether user profiles should provide combined or separate fields for a user to enter their name. For a new installation, we recommend that you specify separate fields. If you're upgrading from an instance that used one field, you should probably stick with one field.
  • On the next page, the Username Case Sensitivity Configuration page, choose whether case sensitivity should be used to look up usernames during account creation or login. For a new installation using the default user system, you should choose case-insensitive lookups. Note that with this option, username values must differ from one another in ways other than case alone.

Other Settings

Specify defaults for feeds (such as RSS) and email sent and received by the application. The application can send email when a account is created for a new user, for email notifications, and so on. Specify the "From" name and email address that should be used in these emails, as well as the SMTP host and port that should be used. The application can also be configured to receive email, such as when a user posts a discussion response via email. To get these emails, the application needs a client account; specify those details here.

You'll be able to change these settings later via the Admin Console.

Set site basics such as its URL, name, and so on.

Setting Description
Site URL The URL that people can enter in the browser address bar to the reach the community.
Space Name The name that should be displayed as the name of the community, such as on the home page.

If this node is an application server node that's part of a cluster, use these settings to enable clustering for this node and to specify the address of the cache server that the cluster will use. For more information on clustering, see Clustering Overview and In-Memory Caching.

Setting Description
Clustering Enabled/Disabled Select Enabled to indicate that this node is part of a cluster of application server nodes. If you enable clustering, you'll need to specify at least one cache server address.
Cache Server Addresses For clustered installations, enter the domain name or IP address of at least one cache server.

Use these settings to connect to your Search service. You have the option of either connecting to Jive's Cloud Search service or installing and connecting to an On Premise Search service.

Setting Options Description
On-Premise Search    
  On-Premise Search Service Host Enter the host name that Jive can use to connect to the Search service. For On-Premise Search, this is the host name for the node where you installed Search. Default is localhost. Refer to system requirements for information on Search node size.
  On-Premise Search Service Port Enter the tcp port that Jive can use to connect to the Search service. Default is 30000.
Cloud Search    
  Search Endpoint For Cloud Search, select the public cloud search end point in your area. For connection information, see Connecting to Jive-Hosted Services.

Enter information that will be used outgoing emails sent from the community, typically to users.

Setting Description
Server Email Name The name displayed in the From box in email sent from the community, such as to welcome new users.
Server Email Address The email address for the sender in email sent from the community.

Set details for handling outgoing email. For more on mail server configuration, see Configuring Outgoing (SMTP) Email.

Setting Description
Email Host Host name of an SMTP email server that the community will use to send email.
Email Port Port to be used for sent email.

Set details for handling incoming email. For more information, see Configuring Support for Content Created Via Email.

Setting Description
Client Protocol Select the protocol used by the incoming email server that the community will use when receiving email to post discussion replies.
Client Account Host Host name of the incoming email server.
Client Account Port Port of the incoming email server.
Username Username for authenticating with the incoming email server.
Password Password for authenticating with the incoming email server.

Admin Account

Specify the system administrator's name, email, and password. Be sure to change the admin email password from the default value, which is "admin".
Note:

After you finish with the setup tool, you'll be prompted to restart the application. You can do this by using the following commands from a command prompt as the jive user on the target computer:

[root@targethost ~]# sudo su - jiver
[1016][jive@targethost:~]$ jive restart webapp
sbs restarted successfully.