Working with Shared Office Documents

With Jive for Office, you can share your Office documents with others in your online community. As you make changes to a shared document on your computer, Jive for Office synchronizes the document with the version that's visible in the community, and provides real-time notifications to users working in the same document. The notifications tell each user when content has changed, and provides the option to incorporate the changes using a merge tool. Because Jive for Office constantly checks for changes, content is always up to date. And Jive for Office also synchronizes comments, tags, and collaboration settings between the community and your local document.

Note: If you have the appropriate permissions, you can edit everything but the content of a shared document in the community.

What You Can Do

With Jive for Office, you can upload Microsoft Office documents to your community, then keep changes to the document in sync while you work in Office.

In particular, with Jive for Office you can:

Get set up

You'll need the Jive for Office add-in to share documents between Office applications and your community, which requires Microsoft Windows. If you don't have the add-in, you can get it when you're viewing an uploaded Office document in the community. Or, open the menu under your avatar and click Tools to download the program.

To get the Jive for Office add-in from any uploaded document:
  1. In your community, navigate to -- or upload -- an Office document.
  2. To the right of your document, click the Download Jive Connects for Microsoft Office link below your Actions menu.

Get connected to your community

After you first install Jive for Office, it might not be completely set up to connect to the community you want to synchronize documents with. To connect, you need to provide your username and password.

To get connected to your community:

  1. In the Jive menu, click Accounts.
  2. Click Add to add your Jive account.
  3. Enter the Community URL, which is the exact URL that you use to navigate and log in to your community.
  4. Enter your Jive username and password.
  5. To begin adding documents to the community, see Add a document to the community.

Add a document to the community

To have an Office document appear in the community, you can either add it using Jive for Office or upload the document from inside the community.

To add a document using Jive for Office:

  1. Connect to the community. For more on this, see Get connected to your community.
  2. Open or create a document in Microsoft Office.
  3. Click Jive > Publish as shown in the following image.
    Note: Once the document lives in the community, clicking Publish Update uploads your changes to the community.

    Publish dialog

  4. In the dialog box, choose where you want to publish the document--you can post it in your private documents, share it with just a few people, or post it in a place where people who are group members or interested in the topic will be more likely to see it. Or publish it to the whole community if you want everyone to be able to see it.
  5. Enter the document's name in the Title field. You can also add tags or categories to help other users find your document in the community, provide an optional description, and decide who can edit your document. You can even change the local file location for your document by editing the Store At path.
    Note: You don’t need to save your document or changes to your document locally before publishing to Jive
  6. Click Publish.
  7. To synchronize documents with the rest of the community, see Keep documents synchronized.
Attention: When you add an Excel spreadsheet to a community, Jive for Office adds a hidden spreadsheet that contains a copy of the original spreadsheet with additional metadata. This copy is used to track changes and allow collaborative working on the spreadsheet.

Once the document is added to the community, you can click Dashboard in the Jive tab to show and hide a panel of information about the document, such as comments, ratings, and the current version number. Expand any of the areas in the Dashboard with a click to see more information. You can also click on an editor or viewer's avatar to see more information about who else is working on the document. The following image shows the Dashboard:
Jive for Office Dashboard

To add a document from inside the community:

  1. From your community, click the pencil icon and select Document.
  2. Select Upload a File.
  3. Select the location for your document.
  4. Click Choose File.
  5. Select the file from your desktop.
  6. Click Publish. Depending on the size of your document, it might take a few seconds to upload it.

Create a new document from an existing one

To avoid a few steps, you can just upload an existing document and rename it as a new document to start fresh with in the community. This creates a new uploaded document in the community, leaving the previous uploaded document in the community as it was when you last synchronized. The new document will have the content of the previous one, but won't have its other properties, such as comments, collaboration settings, tags, and so on.

Note: Making a new document in this way leaves you with an Office document that has the same content, but without all of the community-related information. To get the previous Office document with that information, go to that document's page in your community and click the Download link beneath its preview.

To create a new document from an existing uploaded document:

  1. In Office, open the document you want to start from.
  2. Select Jive > Publish.
  3. Click the Publish as a new document link.
  4. In the dialog box, navigate to the place in the community where you want to save the document.
  5. Enter the new name in the Document Name field at the bottom of the dialog box.
  6. Click Publish.

Keep documents synchronized

After you've connected your community to Office, Jive for Office keeps your documents synchronized with the community. Jive for Office does the following:

To grab document updates from the community:

  1. When your document has been updated by someone in the community, you get a real-time pop-up notification. You can also click Manage to see your merge options right away.

  2. If there are no changes, a message tells you so. Otherwise, select how you want to deal with the changes:
    • Click Replace my version to accept the newer version, overwriting your own local changes.
    • Click Merge and Review to review which changes you want to use. You can choose which changes you want to accept and reject.
    • Ignore to continue working without accepting or rejecting changes at this time.
  3. When you're done working, save your changes so others in the community can see your recent changes.
  4. If at any time you want to overwrite the current local document with the version on the community, click Manage > Replace my version.

Merging Excel and PowerPoint Documents

Jive for Office can merge Excel spreadsheets down to the cell level. Detailed messages in the merge interface will alert you of which cells have been added, deleted, and moved by other editors, so you can decide which of the conflicting cells you'd like to keep and discard before you save the merged document. PowerPoint changes, however, can only be merged at the slide level.

Work with document versions

As you work on a document in Office, Jive for Office keeps track of changes, including community-related information such as comments. It can sync your changes with what's going on in the community with the click of a button. You can even view the changes that have been made since previous versions of the document while in Office. You can also save a previous version as the current one.
Note: The version management feature does its work in part by using the change tracking feature built into Office. That means that if you download a document that someone has made changes to, you might see revision marks placed there by the change tracking feature. The document is fine, but the revision marks can make it hard to read. You can hide the marks in the following ways:
  • In Office 2007, 2010, or 2013, select the Review tab. In the Tracking group, select Final in the Display for Review dropdown to hide the changes.
  • In Office 2003, locate the Reviewing toolbar. In the Display for Review dropdown, select Final.

Work with document revisions

Jive for Office creates a new version of a document whenever you publish your changes to the document.

To view previous versions of a document:
  1. Open a community document. You’ll see the dashboard on the right. (If you don’t, select Jive in the toolbar and click the Dashboard button.)
  2. Under Versions, if the version you want to see isn't visible, scroll down to display it. Previous versions will be listed with the date/time when they were saved and the name of the person who published that version.
  3. From the list of versions, click the one you want to view.
Note: To recover a previous version, open that version and publish it.

Work with document activity

Jive for Office displays a list of activity related to the document. This activity includes versions saved and comments added. By clicking certain items in the activity list, you can see more information or add information to the document. For example, you can expand the comment section to view and add comments.

To view document activity:
  1. In Office, click Jive and then click Dashboard > Show.
  2. You can see details about the document, such as when it was last edited and what version you're looking at.
  3. Click the arrows next to different fields to add or edit information and have it show up in the community.
  4. Click the Comments tab and then Add a Comment to add a comment to the open document. These comments show up in the community as comments. For more on this see Add a comment
  5. You can also browse documents similar to the open document.

Add a comment

When you comment on a document in Office or the community  (as opposed to adding inline comments in the body of a document), your comments are synchronized and appear in both places. When you add inline comments in either location, these comments are visible where they are created, but are not synchronized or visible from the other location.

There are two kinds of comments for shared Office documents:
  • Document comments are like those people make elsewhere in the community. People can usually comment on shared documents just as they comment on other kinds of documents. These are added in the community or in Office. You can see these in Office when you go to Jive > Dashboard and then click the Comments tab.
  • Inline comments appear in the document itself. An inline comment is a way to add a comment to a particular part of the document. When you add an inline comment in the community, it shows up in the community on the Inline Comments tab at the bottom of the document, as well as in the document preview, but is not visible in Office. Inline comments you create in Office can be seen in the Review tab when you select Final Showing Markup in the Tracking group, but cannot be seen in the Jive community.

To add a document comment:

  1. In Office, go to the documents dashboard, expand the Comments sections, and click Add a comment.
  2. Type your comment.
  3. Click Post.
  4. You can also click Reply to reply to an existing comment, or Delete to delete an existing comment.

Add collaborators

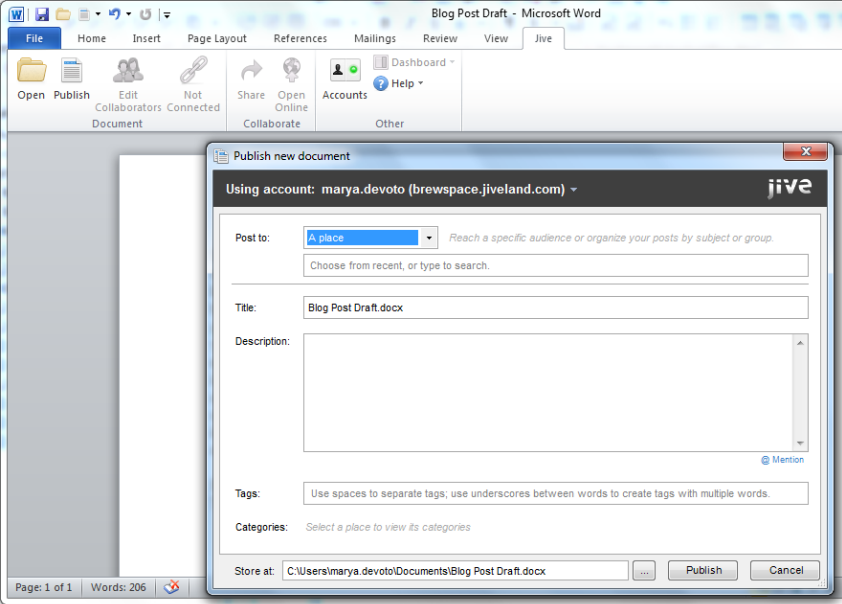
When you use Jive for Office to add a document to your community, you have the following initial publication options:

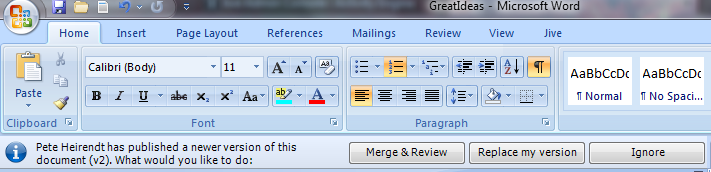
However, you can change these defaults to fit the document needs. If you want to increase the visibility of a document, move it to a bigger container--out of Hidden into a group or space, or from a group into the whole community. You can do this in Jive for Office by publishing the document as a new document in a new place, or in the community by moving it. (Move should be in the Actions menu when you access a document from your community.)

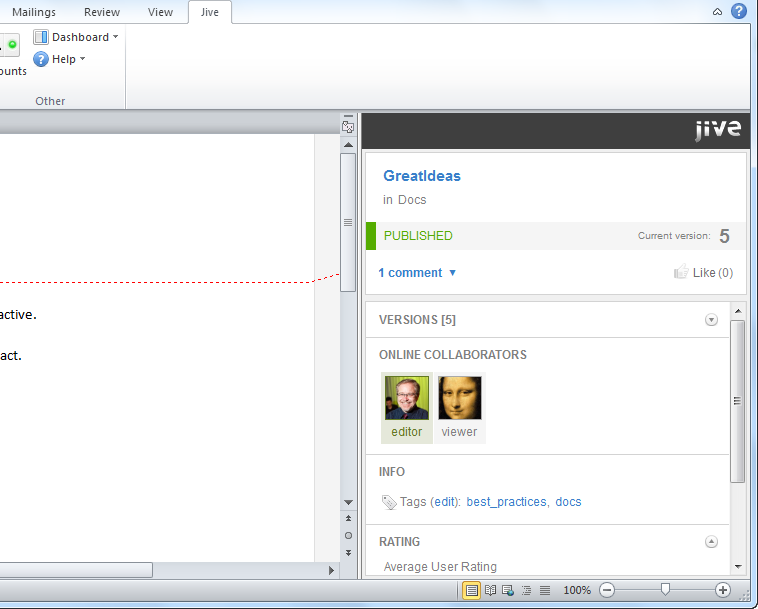
If you want to restrict some people to view access, or limit collaboration to a few people, you can choose instead to change the collaboration settings. These settings are available during initial publication after you select a place: select the Restrict Authors checkbox to access them. If you didn't use this checkbox when you created the document, all the people you granted access to when you created it can edit it as well as view it.

To change collaboration options of a document that's already created:
  1. On the Jive toolbar, click Edit Collaborators .
  2. Select Restrict Authors and then:
    • Only I can edit this document -- Only you can make changes to the document's content.
    • Allow specific people to edit this document Only the people whose names you choose can make changes. If you select this, begin typing the person's name in the box. When their full name appears, click it to add it to the list.
  3. Click Update.
Note: If your document visibility is already limited to "specific people," you'll see a slightly different set of options, but you'll still be able to decide which people who can see the document also have rights to edit it.