Additional configuration for using Oracle 12 and 19 databases with SSL/TLS connection
It is possible to set up the connectivity between the application and database servers to encrypt the data in transit, leveraging Oracle's support for SSL/TLS connections. Here you can find setup instructions.
Even though the database you are using can run in Cloud on AWS RDS or on-premise, the setup includes the same basic steps:
- Enabling TLS encryption support.
- Setting up application servers.
- Installing Jive
Prerequisites and limitations
In this example, we set up Jive on Oracle 19.0 database hosted by AWS RDS using TLS v1.0 and cypher SSL_RSA_WITH_AES_256_CBC_SHA. This setup has been tested on Oracle 12.1 and 19.0 and is applicable for 12.x and 19.x databases. Implementation details may vary depending on the actual DB hosting and version.
The instructions apply to AWS RDS and on-premise installations. Any notable distinctions are noted specifically.
If you are using Oracle databases on AWS RDS, peruse relevant sections of the Amazon Relational Database Service (RDS) documentation on AWS Portal:
- Using SSL with an Oracle DB instance for the necessary Option Group parameters for your database version.
- Oracle Secure Sockets Layer for the details on which TLS protocols are supported by your database version.
- Cipher suites for the Oracle SSL option for cypher suites that can be associated with your database version.
Enabling SSL/TLS encryption support in databases
On AWS RDS
If you are running the Oracle database on AWS RDS, the option group configured for the database must include the SSL option. You can find the necessary parameters for your database version in Using SSL with an Oracle DB instance.
In this example:
- To ensure TLS encryption support, associate an options group that includes an SSL option with your Amazon RDS Oracle DB. For details, refer to Using SSL with an Oracle DB instance.
- Ensure network connectivity is in place for the TLS port. By default, it is port
2484on AWS RDS: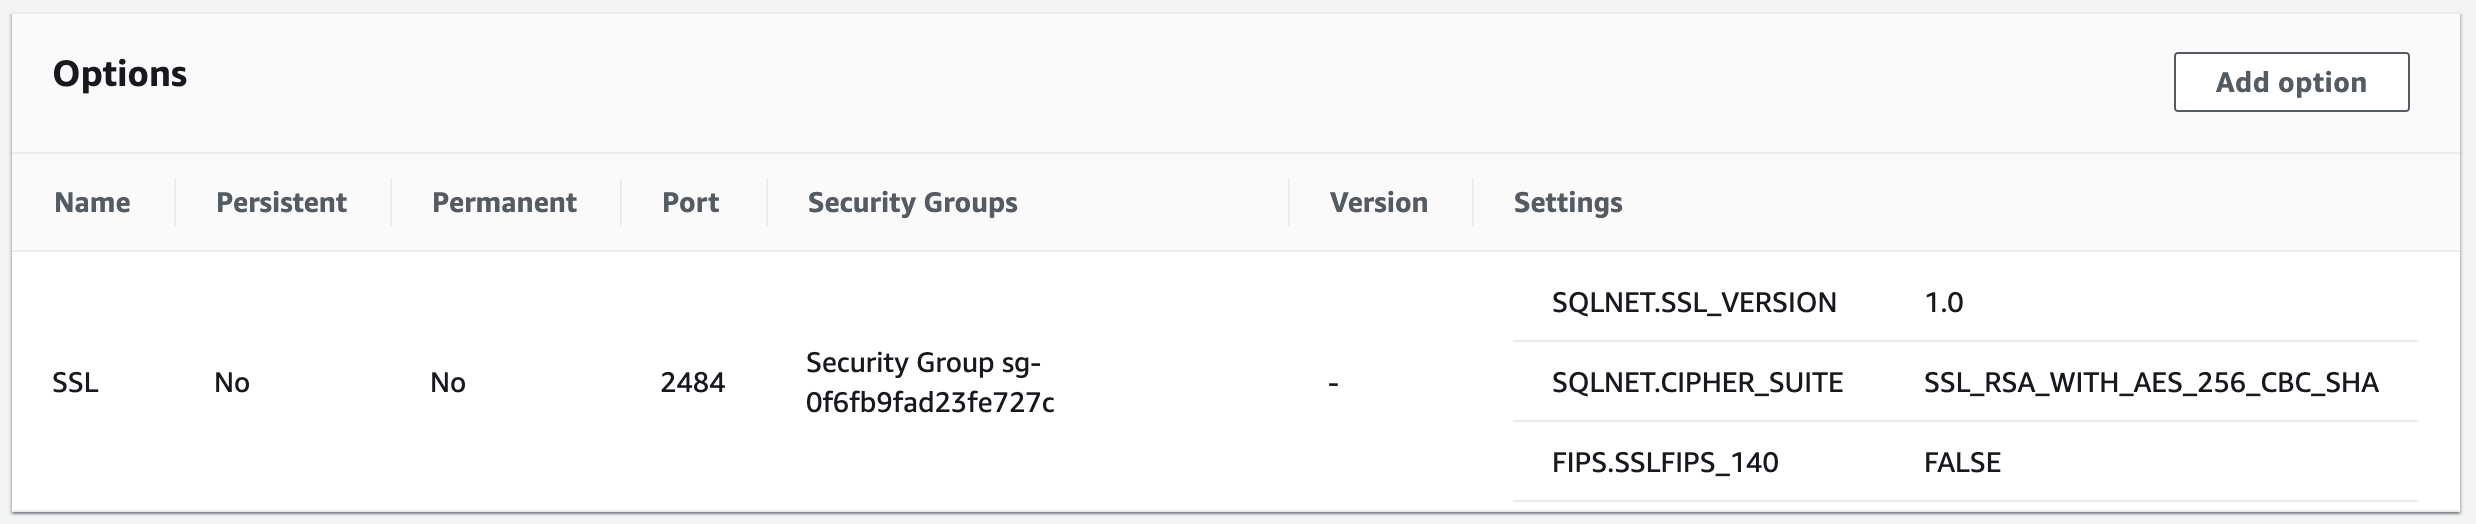
On-premise
If you are running Oracle on-premise, contact your database administrator to have the server set up to support TLS encryption.
Configuring application servers
Follow these steps to configure application servers for Jive:
- Install the Instant Client and Identity and Access Management tool for Oracle certificate wallet configuration. They can be downloaded from the Oracle portal:
For more information, refer to the Oracle documentation.
- Configure SQL*Plus to use SSL with an Oracle DB instance.
Refer to instructions in Configuring SQL*Plus to use SSL with an Oracle DB instance in the Amazon Relational Database Service (RDS) documentation on the AWS portal. For more information, see Setting Up Oracle Wallet Using ORAPKI on the Oracle portal.
- Validate the connectivity from the application servers using SQL*Plus by using the following command:
sqlplus '<mydbuser>@(DESCRIPTION = (ADDRESS = (PROTOCOL = TCPS)(HOST = <endpoint>) (PORT = <ssl port number>))(CONNECT_DATA = (SID = <database name>)))'For example:
sqlplus 'jiveadmin@(DESCRIPTION = (ADDRESS = (PROTOCOL = TCPS)(HOST = jive-db.us-east-1.rds.amazonaws.com) (PORT = 2484))(CONNECT_DATA = (SID = ORCL)))'For more information, see Connecting to an Oracle DB instance using SSL.
- Import the SSL Certificate for the appropriate Certificate Store into Jive's JVM local Certificate Store by using the following command:
sudo su - jive
java/bin/keytool -importcert -file <path to certificate or pem file> -keystore java/jre/lib/security/cacerts -storetype BCFKS -providername BCFIPS -alias "CustomOracleCertificate" -storepass changeit
Note: AWS RDS Certificate is already included in Jive 9.5 onward, so this step may be unnecessary if the Certificate Authority being used is a well-known public entity, such as the one used by AWS.For more information, refer to Steps 1–4 in Connecting to an Oracle DB instance using SSL in the Amazon Relational Database Service (RDS) documentation on the AWS portal.
- On the Webapp nodes, add references for the OJDBC driver installed by Oracle Instant Client by using the following command:
jive set webapp.custom_ld_library_path_additions /usr/local/jive/lib/instantclient_12_2 jive set webapp.custom_classpath_additions /usr/local/jive/lib/instantclient_12_2/ojdbc8.jar - On the EAE server, add references for the OJDBC driver installed by Oracle Instant Client by using the following command:
jive set eae.custom_ld_library_path_additions /usr/local/jive/lib/instantclient_12_2
jive set eae.custom_classpath_additions /usr/local/jive/lib/instantclient_12_2/ojdbc8.jar
Configuring Jive for TLS/SSL usage
After configuring servers, install Jive setting up the TLS/SSL connection to the databases and then configuring the Analytics database as follows:
- Run Jive installer on all nodes by using the following command:
jive start - Install Jive normally and set up the connection strings specifying the secure connection properties on the Database Setting step for the Core database and on the
Activity Engine Settings step for the EAE database.
For example:
Figure: An example of Core Database settings

Figure: An example of Activity Engine (EAE) settings

Jive installs normally and you should be able to use TLS/SSL for the instance.
- For the Analytics database, specify the secure protocol and port in addition to the usual configuration. For details, refer to Configure Analytics Database in the Jive Analytics Help.