Building widgets
This introduction gives you the basics on building widgets — views for displaying content on customizable pages.
People use widgets on the widgetized pages: a community home page, space overview pages, and project overview pages. Widgets provide views of content in the community or on the web, or simply display a message. You can write your own widgets to give views of other content, or even act as enhanced versions of the included widgets.
Widget basics
Your widget can be very basic — such as a single class. At the same time, widgets can also include other files to support your design goals.
A basic widget could include:
- A plugin.xml file for configuration, as with other plugins.
- A Java class for logic (required). Your basic widget (with just a Java class) could
return the HTML to render for the user. The widget class needs to implement the Widget
interface, but you may likely find it easier to do this by extending the
BaseWidgetclass. - FTL files for presenting data (optional). You can use an FTL file to shape the data you present to the user, handle widget resizing, and so on.
- A properties file to provide strings used for widget property names and descriptions (optional).
- i18n keys (optional) to internationalize your widget's UI text.
Creating plugin.xml for configuration
Here's an example. Here, the <widget> element gives the name of your
plugin class.
<plugin xmlns:xsi="http://www.w3.org/2001/XMLSchema-instance"
    xsi:noNamespaceSchemaLocation="http://www.jivesoftware.com/schemas/clearspace/2_5/plugin.xsd">
    <name>Hello World Widget</name>
    <description>Simple example of a widget that says hello.</description>
    <author>Jive Software</author>
    <version>1.0.0</version>
    <minServerVersion>2.5.0</minServerVersion>

    <!-- Defines a custom widget for this plugin -->
    <widget class="com.jivesoftware.clearspace.plugin.example.widget.HelloWorldWidget" />
</plugin>
The <plugin> element's children include information about where the
plugin is coming from, its version (in case you revise it for upgrade later), and so on. The
<minServerVersion> element specifies the minimum application version
that the plugin will run on (it won't load on earlier versions). There's a corresponding
maxServerVersion element also. The code here tells the application that
the plugin includes a widget, and which widget class to load.
Creating Java classes for widget logic
You create a Java class that provides logic for the widget. Your widget class
implements the com.jivesoftware.community.widget.Widget interface, usually by
extending the com.jivesoftware.community.widget.BaseWidget class.
As you implement the class, you do the following:
- Implement three methods that called to display widget essentials.
- Add support for new properties with
accessorsand the@PropertyNamesannotation. - Call helper methods as needed to process an FTL file, support localization, and so on.
Required methods
When you extend the BaseWidget class, you need to implement three methods
from the Widget interface that aren't implemented in BaseWidget:
String getTitle(WidgetContext): This corresponds to your widget's default title. Implement this to return the title that should appear at the top of your widget.String getDescription(WidgetContext): Implement this to return the description that should appear when the user hovers over your widget in the "customize" mode list of widgets.String render(WidgetContext, ContainerSize): Implement this to return the HTML your widget will display when it's published.
You can see that each of these methods takes a WidgetContext instance as a
parameter. The WidgetContext class includes methods through which you can
get information about the context in which the widget instance is executing — its containing
community or space, its current user, request and response objects, and so on. In some
cases, you can be passing the instance to other methods.
Widget types
You use the @WidgetTypeMarker annotation to specify which of the display
contexts your widget is allowed in. Deciding which contexts to allow is an important part of
designing your widget. For example, you might decide that a widget that takes a very
"personal preference" set of property values (such as the Tag widget, which displays content
associated with a particular tag) isn't useful in high-level contexts such as the instance
or space home pages (where the broader set of people viewing might want views on a large
variety of tags).
To indicate which pages your widget supports use on, annotate your widget class declaration
with the @WidgetTypeMarker annotation. This annotation supports values from
the WidgetType enumeration. Here's an example that includes those
values:
@WidgetTypeMarker({WidgetType.HOMEPAGE, WidgetType.PERSONALIZEDHOMEPAGE,
    WidgetType.COMMUNITY, WidgetType.PROJECT})
@PropertyNames("myProperty")
public class MyWidget extends BaseWidget {
    // Implementation code omitted.
}
Exposing widget design-time properties
Each widget exposes properties that the page designer can use to customize how and what the
widget displays. For the two default properties — title and
description — you need only implement getters to return the values that
should be displayed. For properties you add, you do the following:
- Implement accessors through which the application can get and set property values.
- Add a class-level
@PropertyNamesannotation that lists each of the property names. - Include a .properties file that lists the values that should be used in the widget's UI where the user sets properties (there's a .properties file example below.)
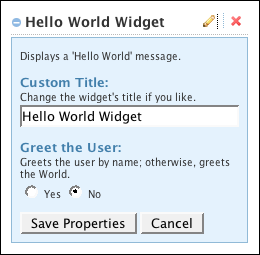
In the following example, the title ("Hello World Widget") and description ("Displays a
'Hello World' message.") are properties implemented through the required accessors
getTitle and getDescription.
Another property, greetUser, is implemented in the widget class through
its own annotation and accessors; the radio buttons here are automatically provided because
the accessors get and set a boolean value. The greetUser property also
provides title and description values through a properties file included in the widget.
Here's the code:
// To hold the value of a custom property.
private boolean greetUser = false;
/**
 * Called to get the description that should be displayed for
 * the widget when the user hovers over it in the "customize" mode list of
 * widgets.
 *
 * @param widgetContext
 *            Context in which the widget instance is executing.
 */
public String getDescription(WidgetContext widgetContext) {
    return "Displays a 'Hello World' message.";
}
/**
 * Called to get the widget's default title. The user will be
 * able to change this. If they do, their new title will be set with a call
 * to the final method BaseWidget.setCustomTitle.
 *
 * @param widgetContext
 *            Context in which the widget instance is executing.
 */
public String getTitle(WidgetContext widgetContext) {
    return "Hello World Widget";
}
/**
 * Called to get the value for the greetUser property.
 *
 * @return true if the user should be greeted; false to greet the world.
 */
public boolean getGreetUser() {
    return greetUser;
}

/**
 * Called to set the value for the greetUser property.
 *
 * @param greetUser
 *            true to greet the user; false to greet the world.
 */
public void setGreetUser(boolean greetUser) {
    this.greetUser = greetUser;
}
Setting FreeMarker properties
If your FTL file uses property variables (for FreeMarker properties, not widget properties), you can add values to the FreeMarker context from within your widget class. When your template is applied, the values you set will be used in generating the output.
Note that the application doesn't add the widget class itself to the FreeMarker context in
the way it does with action plugins. This means that a ${x} property in the
FreeMarker template won't result automatically in a call to a getX() method
in your widget class.
Instead, you should override the BaseWidget.loadProperties(WidgetContext,
ContainerSize) method to add in any variables for FreeMarker properties. Your
implementation should call the superclass's implementation to retrieve the properties Map,
then set additional properties by putting them into the map. That is, you'd add the
x variable to the FreeMarker context using your
loadProperties method implementation.
Here's an example:
public class MyWidget extends BaseWidget {
    // Declare a property variable and setter for injection by Spring.
    private CommunityManager communityManager;
    public void setCommunityManager(CommunityManager cm) {
        this.communityManager = cm;
    }
    protected Map<String, Object> loadProperties(WidgetContext widgetContext,
        ContainerSize size)
    {
        Map<String, Object> properties = super.loadProperties(widgetContext, size);
        // Implementation code omitted.
        properties.put("rootCommunityID", communityManager.getRootCommunity().getID());
        return properties;
    }
}
Helper methods
BaseWidget provides helper methods you might find useful. Here are a
few:
String applyFreemarkerTemplate(WidgetContext, Widget.ContainerSize,
      String)
: Call this to process an FTL file (whose path is given as the String parameter) and get the HTML result.String getLocalizedString(String, WidgetContext): Call this to retrieve the string corresponding to the key i18n key you pass as the first parameter. For more information, see the section of this topic on using i18n keys.Map loadProperties(WidgetContext, Widget.ContainerSize): Override this to add property values to the FreeMarker context. For more information, see the widget class example below.
Implementing context-specific behavior
Because you can create a widget that exists in multiple parts of the application (the home
page, a space, a project), you'll sometimes want to change the behavior of your widget based
on where the widget is being rendered. You can determine the render context of your widget
by checking the type of the WidgetContext class that you're given in the
loadProperties method. Here's some example code that shows how you can
determine what context the widget is in:
public
class MyWidget extends BaseWidget {
    protected Map<String, Object>
loadProperties(WidgetContext widgetContext, ContainerSize size) {
        Map<String, Object> properties = super.loadProperties(widgetContext, size);
        if (widgetContext.getWidgetType() == WidgetType.COMMUNITY) {
            CommunityWidgetContext cwc = (CommunityWidgetContext)widgetContext;
            // Do something specific for the community
        }
        else if (widgetContext.getWidgetType() == WidgetType.HOMEPAGE) {
            HomepageWidgetContext hwc = (HomepageWidgetContext)widgetContext;
            // Do something specific for the homepage
        }
        else if (widgetContext.getWidgetType() == WidgetType.PERSONALIZEDHOMEPAGE) {
            PersonalizedHomepageWidgetContext phwc =
                (PersonalizedHomepageWidgetContext)widgetContext;
            // Do something specific for the personalized homepage
        }
        else if (widgetContext.getWidgetType() == WidgetType.PROJECT) {
            ProjectWidgetContext wwc = (ProjectWidgetContext)widgetContext;
            // Do something specific for the project
        }

        properties.put("rootCommunityID", communityManager.getRootCommunity().getID());
        return properties;
    }
}
Widget class example
Here's the full code of a widget class.
package com.jivesoftware.clearspace.plugin.example.widget;
import com.jivesoftware.community.annotations.PropertyNames;
import com.jivesoftware.community.widget.*;
import java.util.Map;
// The WidgetTypeMarker annotation tells which kinds of pages this
// widget can be used on. This widget will show up in the widget list
// on the home page (the one seen by everyone) and a space overview
// page. Other supported values include WidgetType.PERSONALIZEDHOMEPAGE and WidgetType.PROJECT.
@WidgetTypeMarker({WidgetType.HOMEPAGE, WidgetType.COMMUNITY})
@PropertyNames("greetUser")
public class HelloWorldWidget extends BaseWidget {
    // FreeMarker template for rendering preview and published widget.
    private static final String FREEMARKER_FILE = "/plugins/example/resources/hello-world.ftl";
    // To hold the value of a custom property.
    private boolean greetUser = false;
    /**
     * Called to get the description that should be displayed for
     * the widget when the user hovers over it in the "customize" mode list of
     * widgets.
     *
     * @param widgetContext
     *            Context in which the widget instance is executing.
     */
    public String getDescription(WidgetContext widgetContext) {
        return "Displays a 'Hello World' message.";
    }
    /**
     * Called to get the widget's default title. The user will be
     * able to change this. If they do, their new title will be set with a call
     * to the final method BaseWidget.setCustomTitle.
     *
     * @param widgetContext
     *            Context in which the widget instance is executing.
     */
    public String getTitle(WidgetContext widgetContext) {
        return "Hello World Widget";
    }
    /**
     * Called to get the value for the greetUser property.
     *
     * @return true if the user should be greeted; false to greet the world.
     */
    public boolean getGreetUser() {
        return greetUser;
    }
    /**
     * Called to set the value for the greetUser property.
     *
     * @param greetUser
     *            true to greet the user; false to greet the world.
     */
    public void setGreetUser(boolean greetUser) {
        this.greetUser = greetUser;
    }
    /**
     * Called to get the HTML used to display the widget when it's
     * previewed or published.
     *
     * @param widgetContext
     *            Context in which the widget instance is executing.
     * @param containerSize
     *            An enum constant representing the size of the widget
     *            instance's current container: LARGE or SMALL.
     */
    public String render(WidgetContext widgetContext,
            ContainerSize containerSize) {
        // Process the included FTL file to render the HTML for display.
        return applyFreemarkerTemplate(widgetContext, containerSize,
                FREEMARKER_FILE);
    }
    /**
     * Called to get properties for use in your FTL file. These
     * will be added to the FreeMarker context.
     *
     * @param widgetContext
     *            Context in which the widget instance is executing.
     * @param containerSize
     *            An enum constant representing the size of the widget
     *            instance's current container: LARGE or SMALL.
     * @return A map of the properties and their values.
     */
    protected Map<String, Object> loadProperties(WidgetContext widgetContext,
            ContainerSize containerSize) {
        // First load existing properties.
        Map<String, Object> properties = super.loadProperties(widgetContext,
                containerSize);
        // Get the name of the community this instance is in, then add it as a
        // property.
        String communityName = ((CommunityWidgetContext)widgetContext).getCommunity().getName();
        String userName = widgetContext.getUser().getName();
        properties.put("communityName", communityName);
        properties.put("userName", userName);
        properties.put("greetUser", greetUser);
        return properties;
    }
}
Writing Properties files
You need to create a .properties file that provides the strings used in the design-time user interface.
In the widget JAR, this file is located at
<jar_root>/classes/beans/HelloWorldWidget.properties.
# Resource bundle for Hello World Widget
# Author of widget
author=Me
# Version of the widget
version=1.0
# Properties - Display name and description
greetUser.displayName=Greet the User
greetUser.shortDescription=Greets the user by name; otherwise, greets the World.
Note that the greetUser part of the keys matches the name of the property as
given in the @PropertyNames annotation.
Writing FTL files
You use a FreeMarker template (FTL) file to shape the data you're presenting in your published widget.
The FTL file must be on the application classpath; that can be accomplished by including it
in your widget JAR file, then loading it at the relative location using the
applyFreemarkerTemplate helper method. For more information, see the
widget class code example.
Handling widget resizing
When someone clicks the Customize link to begin designing a layout, the design space includes a list of installed widgets and an area for arranging widgets. This area can be divided into multiple columns; the user chooses which configuration they want. In a multi-column layout, when someone drags your widget between large and small columns, the widget is resized from a large size to a small size.
Here's a view with the same widget on both sides of a two-column layout:
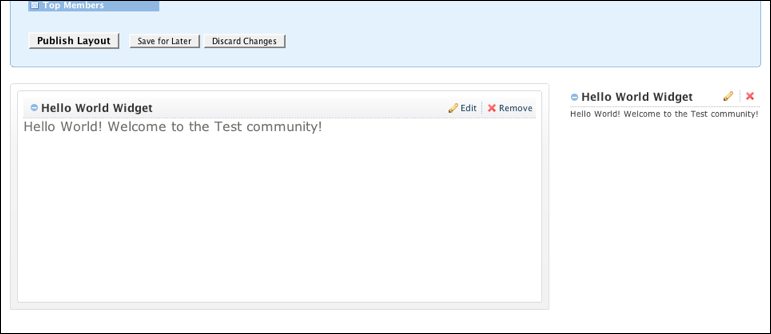
Each widget is responsible for its display characteristics, including adjusting within its
frame when its size changes. In your FTL file, you can handle each of these cases by
providing a large rendering and a small one. You do that by testing for the value of the
enum com.jivesoftware.community.widget.Widget.ContainerSize; its two values
are LARGE and SMALL.
<style type="text/css">
    .jive-widget .jive-widget-body p.gobig {
        font: 16px verdana, helvetica, sans-serif;
    }
    .jive-widget .jive-widget-body p.getsmall {
        font: 10px verdana, helvetica, sans-serif;
    }
</style>
<#-- Use the widget's greetUser property to define the greeting style. -->
<#if greetUser>
        <#assign greeting = "Hello " + userName + "!">
<#else>
        <#assign greeting = "Hello World!">
</#if>
<#-- Render for display in a small area. -->
<#if containerSize == enums['com.jivesoftware.community.widget.Widget$ContainerSize'].SMALL>
    <p class="getsmall">${greeting} Welcome to the ${communityName} community!</p>
<#-- Render for display in a large area. -->
<#else>
    <p class="gobig">${greeting} Welcome to the ${communityName} community!</p>
</#if>