Setting up content moderation
Content moderation in a place is enabled in three steps: selecting the place to be moderated, selecting the content types to be moderated in the place, and assigning the moderators for the place.
- You cannot moderate content created in private groups, secret (also known as private unlisted) groups, or content that has visibility limited to the author (Hidden) or specific users.
- Make sure you understand how moderation inheritance works before you enable moderation in a place. For more information, see Moderation inheritance in groups and spaces.
Setting up global content moderation
When you enable moderation in the root container, you are enabling moderation there and in all social groups (because they are contained by the system space and inherit its moderation settings).
Moderation requests submitted in the system container or any group are sent to global moderators, if there is one, and if not, to the Full Access users. For more information, see Moderator roles. For more information on setting up permissions, see Overview of permission assignments.
To set up moderation in the root container and all groups:
- In the Admin Console, go to .
- Click Change space and select the top-level root container space.
By default, the root space is named community.
- Select the check boxes for the content types you want to moderate and clear the check
box for content that does not require moderation.
The moderators will review the selected content types.
- Click Save changes.
- Go to , and select the root space.
- Click Create a user override, select the users you want to be moderators, and then click Set exception.
- In the Set Exception dialog box, select User can
manage space, and then select .
You can also set a whole group as the moderators by clicking Add group, selecting the group, setting the permission level to Moderate, and then Add Group.
With moderation configured, the selected users or all users of the selected user group are able to view and moderate the specified content types for social groups.
Setting up space content moderation
When you enable moderation in a space or sub-space, you are enabling moderation in only that space or sub-space and its projects (because projects inherit the moderation settings of their container space or sub-space).
Moderation requests submitted in the space first are sent to space moderators, if there is one, and if not, to global moderators. If there is no Global Moderator assigned, the moderation request will go to the Full Access users. For more information, see Moderator roles.
To set up moderation in a space or sub-space (and its projects):
- In the Admin Console, go to .
- Click Change space and select the space you want to moderate.
- Select the check boxes for the content types you want to moderate and clear the check
box for content that does not require moderation.
The moderators will review the selected content types.
- Click Save changes.
- Go to , and select the space for which you enabled moderation.
- Click Create a user override, select the users you want to be moderators, and then click Set exception.
- In the Set Exception dialog box, select User can
manage space, and then select .
You can also set a whole group as the moderators by clicking Add group, selecting the group, setting the permission level to Moderate, and then Add Group.
With moderation configured, the selected users or all users of the selected user group are able to view and moderate the specified content types for the specified space.
Reviewing Content Moderation Requests
If you are a moderator for a place, you'll have access to a list of requests for moderation.
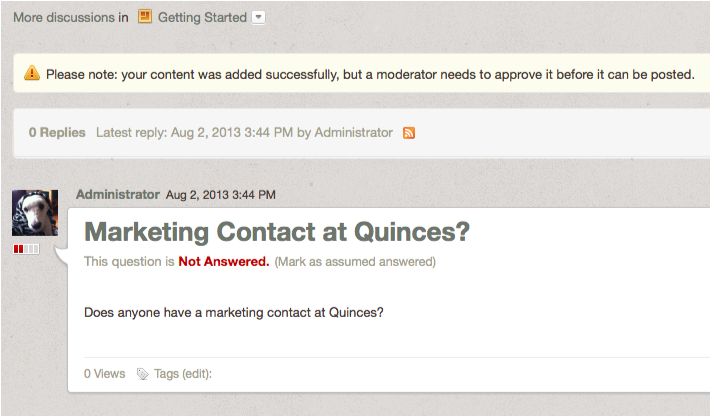
In places where content moderation is enabled, the author of a piece of content will see a note explaining that their content needs to be approved by the moderator before it will be published:
After the author submits the post, a moderation request will be sent to the moderator's Moderation queue for approval or rejection. (The community administrator sets up moderators for places. There can be more than one moderator in a place. For more about that, see Setting Up Content Moderation). Note that the author can still access the submitted content by going to , where they can continue to make changes. The moderator will see only one item to moderate, no matter how many changes the author makes.

If there is more than one item awaiting moderation, you'll see a list in your Moderation queue. For example, you might see content that's been reported as abusive, as well as content that's been submitted for moderation, depending on the moderation features set up by your community administrator. The following example shows a variety of items awaiting moderation:
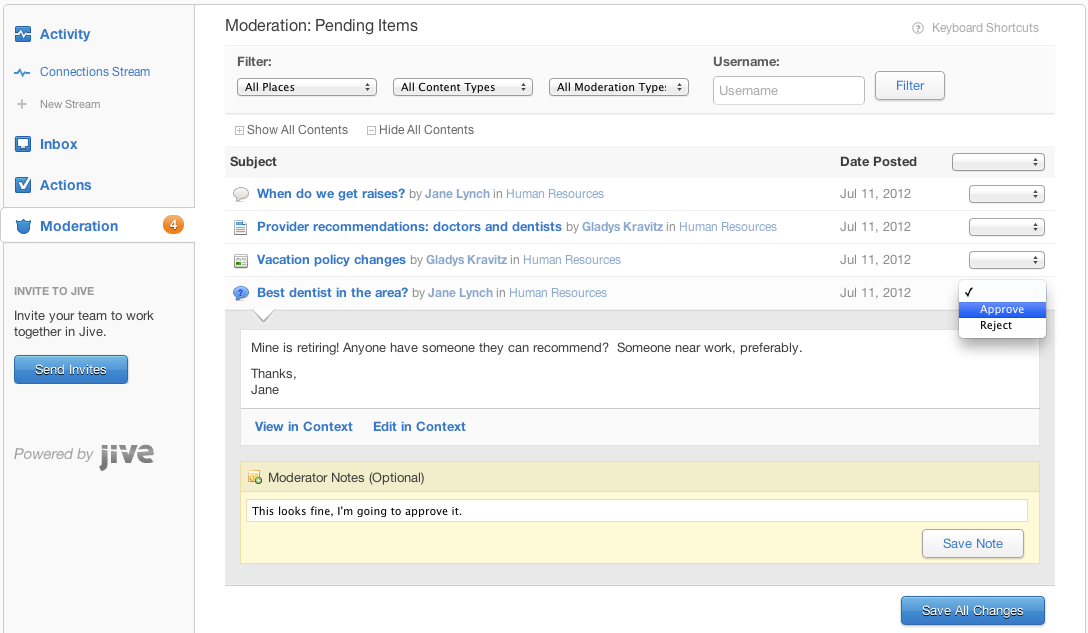
Notice that at the top of the page, you can filter the content listed. Filtering can be helpful when you've got a very long list.
To moderate, simply click on an item and make a decision to:
- Approve the content. This will publish the content in the community. You will no longer see the item in your moderation queue.
- Edit the content. You'll be taken to the content editor to make changes.
- Reject the content. This will make the content invisible to users. If you (or another moderator) reject the content, its author will be notified via email. You can edit the template content of this email -- see Managing Email Templates for more information. When you reject a discussion reply, the individual reply is hidden, but its parent and children remain visible. Once something has been rejected by you or another moderator, you can still see the item in the Admin Console under . From there, you can edit the item by clicking the pencil icon next to it and then publish the item if you've changed your mind about it. Remember that all social groups are contained by the system (root) space, so you will see content items here from groups.
- Leave a note. This note is for other moderators; it is not displayed to regular users. For example, you might explain to another moderator why you think the content should be approved or rejected. Moderator notes are not preserved after the content has left the moderation queue (because, for example, the content was approved).